

Introduction
If you have written code at any point in the last few years, you have probably bumped into tools like Cursor, Claude Code, or Codex. They feel almost magical: you type a prompt, hit enter, and suddenly your editor is refactoring files, fixing tests, or wiring up APIs for you.
At some point, you probably asked yourself the same question I did: How do these tools even work underneath?
You might have gone down the rabbit hole of frameworks, libraries, and new buzzwords, trying to decode phrases like agentic AI or tool use. Maybe you even wired a few things together and got something working, but it still felt like a black box that you could not fully see through.
When we do not fully understand something, our brains try to fill the gaps on our own. I have seen this in myself and in others: missing pieces of information quietly turn into worry, then into hesitation, and sometimes into outright panic. It is easy to feel like you are behind or that everyone else knows a secret you do not.
This post is my way of opening that box and showing you what is inside.
I want to walk you through how a code editing agent really works, from the inside out. Not at the slide-deck level, but at the level where you could open your editor and build one yourself.
Here is the surprising part: a fully functional code editing agent is much simpler than it looks. Watching an agent to edit files, run shell commands, recover errors, and try different strategies can feel like magic. It is not.
At the core, it is simply:
• A while loop
• A few well-chosen tools
• and an LLM glued on top
That is, it.
You can build a working agent in under 400 lines of code, and most of that is just wiring and boilerplate. In the rest of this post, we will peel back the layers and walk through how to do exactly that.
Some background
If you’d rather jump straight to the hands-on pieces, feel free to skip to next section.
What is an Agent?
An agent is a system that can take input, decide what to do next, and act on that decision using tools or code, all while looping through this process until it reaches a goal.
In simple terms, an agent does three things:
1. It looks at the current situation
2. It decides the next action using an LLM
3. It performs that action with the tools it has
Then it repeats the cycle until the task is complete
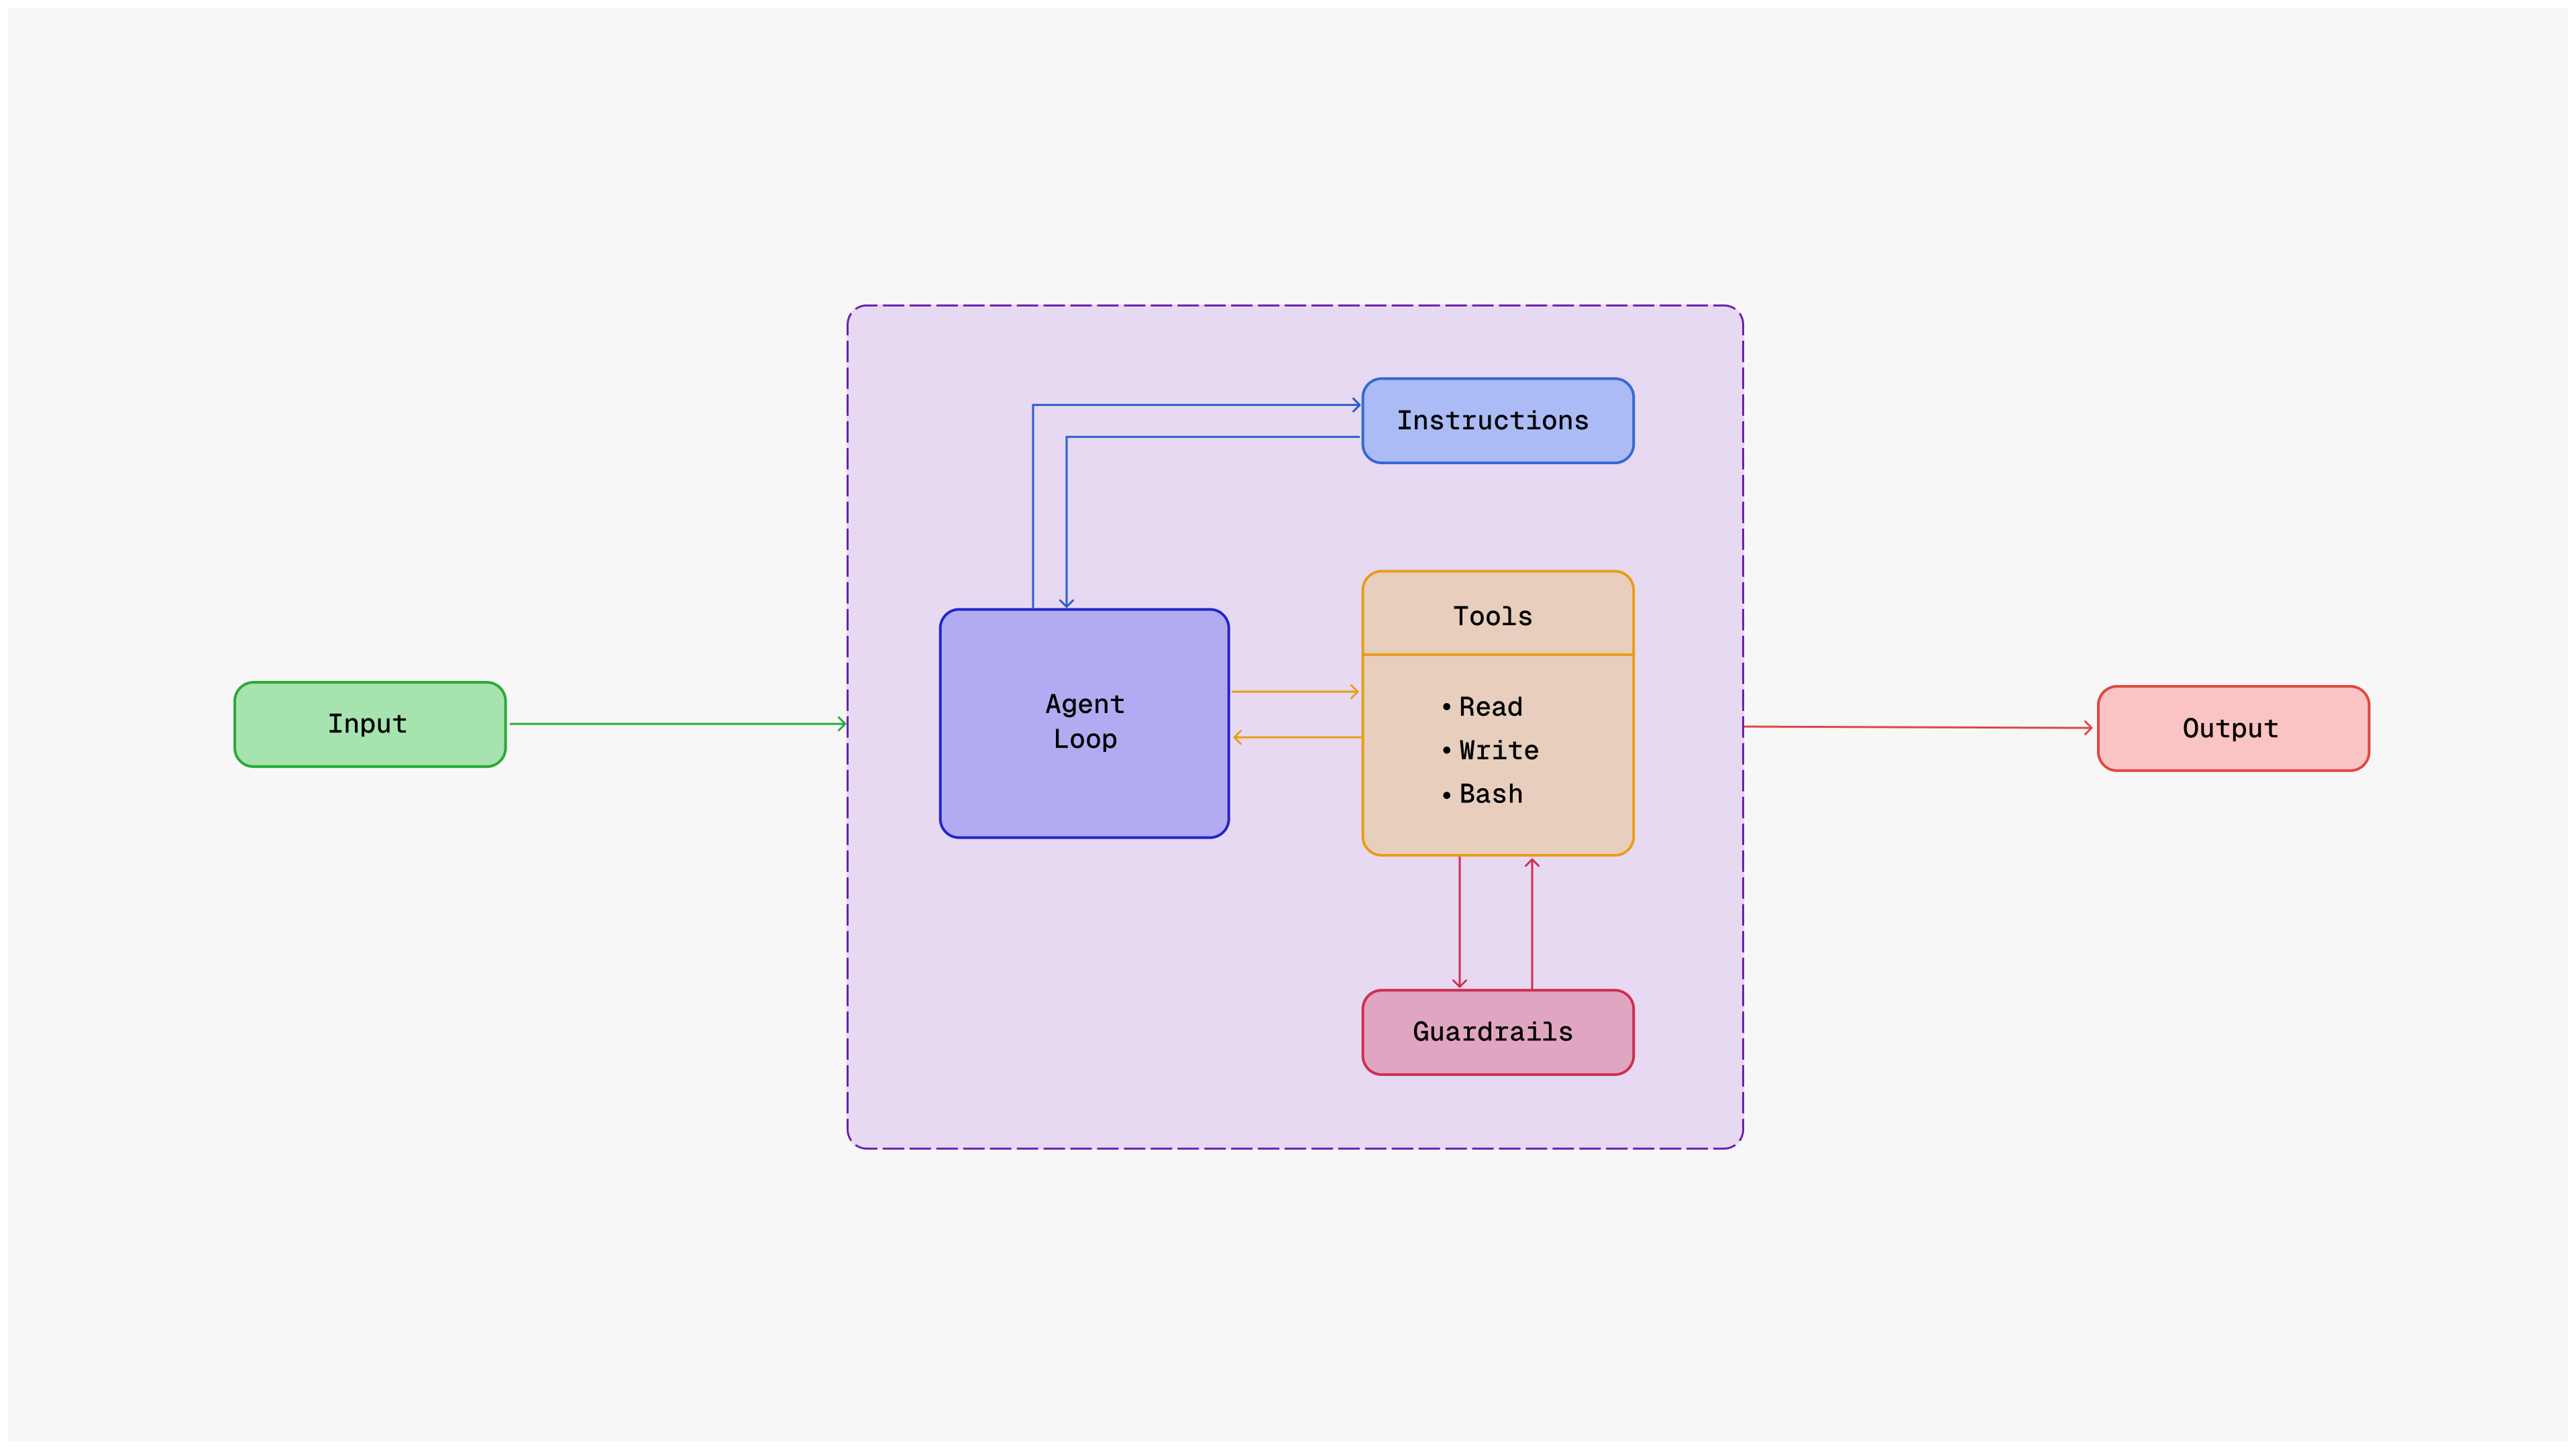
Agent Architecture
References
What you need
Before we start, here’s what you’ll need:
- Bun
- AWS credentials with Bedrock access
- Anthropic model access (e.g. Claude 3.5 Sonnet)
- A terminal
Install the dependencies
1 bun add @ai-sdk/amazon-bedrock ai zodYup, that’s it.
Configure AWS/Bedrock credentials
Drop your AWS keys and preferred model into an
.env file so Bun can read them at runtime:
1 # .env.local
2 AWS_REGION=us-east-1
3 AWS_ACCESS_KEY_ID=AKIA...
4 AWS_SECRET_ACCESS_KEY=xxxxxxxxxxxxxxxxxxxx
5 ANTHROPIC_MODEL_ID=anthropic.claude-3-5-sonnet-20240620-v1:0
Load this file before running the CLI
(bun --env-file .env.local run index.ts ).
If you have not enabled Bedrock/Claude in your AWS account yet, follow the official setup guide first.
Step 1: The Skeleton
Let’s start with a simple step. Create a new file index.ts
Here’s the basic shape of our app:
1 import { createAmazonBedrock } from "@ai-sdk/amazon-bedrock";
2 import { streamText, tool, stepCountIs } from "ai";
3 import type { ModelMessage } from "ai";
4 import { z } from "zod";
5 import * as readline from "node:readline";
We import a few things.
The Vercel AI SDK gives us streamText for responses, tool for defining actions, and stepCountIs for multi-step reasoning. zod for schema validation of tool inputs. readline lets us get user input from the terminal
Step 2: Setting Up Bedrock
Now we connect to Amazon Bedrock.
Here’s how simple it is:
1 const bedrock = createAmazonBedrock({
2     region: Bun.env.AWS_REGION || "us-east-1",
3     accessKeyId: Bun.env.AWS_ACCESS_KEY_ID,
4     secretAccessKey: Bun.env.AWS_SECRET_ACCESS_KEY,
5   });
6
7 const MODEL_ID = Bun.env.ANTHROPIC_MODEL_ID || "anthropic.claude-3-5-sonnet-20240620-v1:0
8
That’s it. You have your model ready.
It’ll automatically talk to Claude via Bedrock, and you can swap models just by changing ANTHROPIC_MODEL_ID in your .env .
Step 3: Handling Input and Exit
We need a way to read user input and exit gracefully
1 const rl = readline.createInterface({
2  input: process.stdin,
3  output: process.stdout,
4 });
5
6 function getUserInput(prompt: string): Promise<string> {
7   return new Promise((resolve) => {
8       rl.question(prompt, (answer) => {
            resolve(answer);
10      });
11   });
12 }
13
14 const handleExit = () => {
15  console.log("Goodbye! Have a nice day!");
16  rl.close();
17  process.exit(0);
18 };
19
20 process.on("SIGINT", handleExit);
Step 4: Define the Tools
This is where we transform our chatbot into an agent. Tools give your agent the ability to interact with the world.
The Read, Write, and Bash Tools
Add import { stat } from “node:fs/promises”; near the top of your file so we can safely validate directories. Then define all three tools in one block:
1 const tools = {
2  read: tool({
3    description: "Read the contents of a file from the filesystem",
4    inputSchema: z.object({
5      filePath: z.string().describe("The path to the file to read"),
6    }),
7    execute: async ({ filePath }) => {
8      try {
9        console.log(`\n\n [-] READ: ${filePath}\n`);
10
11        const file = Bun.file(filePath);
12        const exists = await file.exists();
13
14        if (!exists) {
15          return `Error: File not found: ${filePath}`;
16        }
17
18        const content = await file.text();
19        return content;
20      } catch (error) {
21        if (error instanceof Error) {
22          return `Error reading file: ${error.message}`;
23        }
24        return "Unknown error reading file";
25      }
26    },
27  }),
28  write: tool({
29    description: "Write content to a file on the filesystem",
30    inputSchema: z.object({
31      filePath: z.string().describe("The path to the file to write"),
32      content: z.string().describe("The content to write to the file"),
33    }),
34    execute: async ({ filePath, content }) => {
35      try {
36        console.log(`\n\n [-] WRITE: ${filePath}\n`);
37
38        const file = Bun.file(filePath);
39        const exists = await file.exists();
40
41        if (exists) {
42          console.log(`    └─ Overwriting existing file\n`);
43        }
44
45        await Bun.write(filePath, content);
46        const bytesWritten = new TextEncoder().encode(content).length;
47
48        return `File written successfully to: ${filePath} (${bytesWritten} bytes)`;
49      } catch (error) {
50        if (error instanceof Error) {
51          return `Error writing file: ${error.message}`;
52        }
53        return "Unknown error writing file";
54      }
55    },
56  }),
57  bash: tool({
58    description: "Execute shell commands on the system",
59    inputSchema: z.object({
60      command: z.string().describe("The shell command to execute"),
61      description: z.string().optional().describe("Optional description of what this comm
62      workingDirectory: z.string().optional().describe("Working directory for command exe
63      timeout: z.number().optional().default(30000).describe("Timeout in milliseconds (de
64    }),
65    execute: async ({ command, description, workingDirectory, timeout }) => {
66      try {
67        // Validate working directory if provided
68        if (workingDirectory) {
69          try {
70            const dirStats = await stat(workingDirectory);
71            if (!dirStats.isDirectory()) {
72              const errorMsg = `Error: Working directory is not a directory: ${workingDir
73              return {
74                title: command,
75                metadata: {
76                  output: errorMsg,
77                  exit: -1,
78                  description: description,
79                },
80                output: errorMsg,
81              };
82            }
83          } catch {
84            const errorMsg = `Error: Working directory does not exist: ${workingDirectory
85            return {
86              title: command,
87              metadata: {
88                output: errorMsg,
89                exit: -1,
90                description: description,
91              },
92              output: errorMsg,
93            };
94          }
95        }
96
97        const cwd = workingDirectory || process.cwd();
98
99        // Log execution details
100        console.log(`\n\n [-] BASH: ${command}\n`);
101        if (description) {
102          console.log(`    ├─ Description: ${description}`);
103        }
104        if (workingDirectory) {
105          console.log(`    ├─ Working dir: ${workingDirectory}`);
106        }
107
108        // Execute command using Bun.spawn
109        const proc = Bun.spawn(["/bin/sh", "-c", command], {
110          cwd: cwd,
111          stdout: "pipe",
112          stderr: "pipe",
113          env: process.env,
114        });
115
116        // Set up timeout
117        let timeoutId: ReturnType<typeof setTimeout> | undefined;
118        const timeoutPromise = new Promise<never>((_, reject) => {
119          timeoutId = setTimeout(() => {
120            proc.kill();
121            reject(new Error(`Command timed out after ${timeout}ms`));
122          }, timeout);
123        });
124
125        // Execute and capture output
126        try {
127          const [stdout, stderr, exitCode] = await Promise.race([
128            Promise.all([
129              new Response(proc.stdout).text(),
130              new Response(proc.stderr).text(),
131              proc.exited,
132            ]),
133            timeoutPromise,
134          ]);
135
136          // Clear timeout if command completed
137          if (timeoutId) clearTimeout(timeoutId);
138
139          // Combine stdout and stderr
140          const output = stdout + (stderr ? `\nstderr: ${stderr}` : "");
141
142          console.log(`\n\n [+] ${command}\n`);
143          console.log(`\n\n ${output}\n`);
144
145          return {
146            title: command,
147            metadata: {
148              output: output || "(no output)",
149              exit: exitCode,
150              description: description,
151            },
152            output: output || "(no output)",
153          };
154        } catch (timeoutError) {
155          // Clear timeout on error
156          if (timeoutId) clearTimeout(timeoutId);
157
158          if (timeoutError instanceof Error && timeoutError.message.includes("timed out"
159            const errorMsg = timeoutError.message;
160            return {
161              title: command,
162              metadata: {
163                output: errorMsg,
164                exit: -1,
165                description: description,
166              },
167              output: errorMsg,
168            };
169          }
170          throw timeoutError;
171        }
172      } catch (error) {
173        const errorMsg = error instanceof Error
174          ? `Error executing command: ${error.message}`
175          : "Unknown error executing command";
176
177        return {
178          title: command,
179          metadata: {
180            output: errorMsg,
181            exit: -1,
182            description: description,
183          },
184          output: errorMsg,
185        };
186      }
187    },
188  }),
189 };
190
Each tool now lives in the same snippet, so you can copy/paste the whole const tools block without hunting for closing braces.
These tools transform your chatbot into an agent. With them, Claude can:
• Read any file on your system
• Create or modify files
• Run shell commands
• Chain these actions together to complete complex tasks
Step 4.5: Add Guardrails
Before letting an automated agent loose on your filesystem, add some guardrails so it cannot accidentally delete the wrong folder
or exfiltrate credentials.
Here are three lightweight patterns you can layer on immediately:
1. Command approval – wrap the bash tool so it asks for confirmation on anything outside an allow‑list.
1 const SAFE_COMMAND_PREFIXES = ["ls", "pwd", "cat", "bun test", "bun run"];
2
3 function needsApproval(command: string) {
4  return SAFE_COMMAND_PREFIXES.every((prefix) => !command.startsWith(prefix));
5 }
6
Inside execute, short‑circuit with return “Command blocked” or prompt the user if needsApproval(command)
returns true.
2. Read‑only mode – expose an environment flag such as AGENT_READ_ONLY. In the write tool, throw when the flag is set;
in the bash tool, disallow commands that contain rm, mv, or > redirections while in read‑only mode.
3. Path sandboxing – define SAFE_ROOT = Bun.env.SAFE_ROOT || process.cwd() and verify with path.resolve(filePath).startsWith(SAFE_ROOT) before touching the filesystem. This prevents the agent from wandering into ~/.aws, /etc, etc.
These checks add only a handful of lines but dramatically lower the blast radius. You can later grow them into richer policy engines (ACL files, per-tool permissions, user prompts, etc.), yet even the basic versions catch most “oops” moments.
Step 5: The Agent Loop
Now let’s put it all together. This is where the magic happens
1 async function main() {
2  console.log("\nClaude CLI v0.1");
3  console.log("------------------------------------------------");
4  console.log("Type your questions and press Enter to chat.");
5  console.log("Press Ctrl+C to leave the chat.");
6  console.log("");
7
8  const conversationHistory: ModelMessage[] = [];
9
10  while (true) {
11    try {
12      const userMessage = await getUserInput("> ");
13
14      // Skip when user presses Enter
15      if (userMessage.trim() === "") {
16        continue;
17      }
18
19      // Store user message in history
20      conversationHistory.push({
21        role: "user",
22        content: userMessage,
23      });
24
25      // Stream response from Claude via Bedrock with multi-step tool calling
26      console.log("");
27      process.stdout.write("✶ ");
28
29      let fullResponse = "";
30      const result = streamText({
31        model: bedrock(MODEL_ID),
32        messages: conversationHistory,
33        tools,  // ← Our tools from Step 4
34        stopWhen: stepCountIs(10), // ← Allow up to 10 steps - enough for complex tasks w
35      });
36
37      // Stream ALL text from all steps (including after tool execution)
38      for await (const textPart of result.fullStream) {
39        if (textPart.type === 'text-delta') {
40          process.stdout.write(textPart.text);
41          fullResponse += textPart.text;
42        }
43      }
44
45      console.log("\n");
46
47      // Wait for the complete response with all steps
48      const response = await result.response;
49
50      // Add all response messages to conversation history
51      conversationHistory.push(...response.messages);
52    } catch (error) {
53      if (error instanceof Error) {
54        console.error("[Error]:", error.message);
55      } else {
56        console.error("[Error]: An unknown error occurred");
57      }
58    }
59  }
60 }
61
62 main();
63
Key Changes from a Chatbot:
1. Tools are passed in: We add tools to the streamText call, giving Claude access to our read, write, and bash tools
2. Multi-step reasoning: stepCountIs(10) allows Claude to use tools multiple times in a single response. It can read a file, analyze it, create a new file, run tests, and fix errors all in one go, while preventing runaway loops that could exhaust your token budget
3. Full stream instead of text stream: We use result.fullStream and filter for text-delta events. This lets us see both Claude’s thinking AND tool outputs
4. All messages preserved: We spread …response.messages to keep the full conversation history including tool calls and results
Step 6: See It in Action
Once it’s ready, just run
1 bun run index.tsExample 1: Reading Files
1 > What's in the package.json file?
2
3 ✶ I'll read the package.json file for you.
4
5 [-] READ: package.json
6
7 Looking at your package.json, you have a simple Node.js project with these dependencies:
8- @ai-sdk/amazon-bedrock (^1.0.10) - For AWS Bedrock integration
9- ai (^4.1.11) - The Vercel AI SDK
10- zod (^3.24.1) - For schema validation
11
12 The project is set up to run with Bun using TypeScript.
13
Example 2: Creating Files
1 > Create a hello.txt file with "Hello World" content
2
3 ✶ I'll create the hello.txt file for you.
4
5 [-] WRITE: hello.txt
6
7 File written successfully to: hello.txt (11 bytes)
8
9 I've created the hello.txt file with "Hello World" as the content.
10
Example 3: Running Commands
1 > List all TypeScript files in this directory
2
3 ✶ I'll list all TypeScript files for you.
4
5 [-] BASH: ls *.ts
6
    ├─ Description: List TypeScript files
7
8 [+] ls *.ts
9
10 index.ts
11
12 There's one TypeScript file in this directory: index.ts
13
Example 4: Multi-Step Tasks
1 > Create a simple test.js file, then run it with bun
2
3 ✶ I'll create a test.js file and then run it for you.
4
5 [-] WRITE: test.js
6
7 File written successfully to: test.js (29 bytes)
8
9 Now let me run it:
10
11 [-] BASH: bun test.js
12
    ├─ Description: Run the test.js file
13
14 [+] bun test.js
15
16 Hello from test.js!
17
18 Perfect! I've created a test.js file with a simple console.log statement and ran it succe
19
Notice how the agent uses multiple tools in sequence, maintaining context throughout the interaction.
Why This Is An Agent
You might wonder: what’s the difference between a chatbot and an agent? Here’s the key distinction:
Chatbot vs Agent
| Chatbot | Agent | |
|---|---|---|
|
1 |
You ask →
It answers |
You ask →
It thinks |
|
2 |
Can only talk |
Can use tools |
|
3 |
Single response |
Multiple steps |
|
4 |
Passive |
Active |
|
5 |
Conversation only |
Gets things done |
What Makes Our CLI an Agent:
1. Tool Usage: The agent can interact with your file system and execute commands. It doesn’t just talk about code; it reads, writes, and runs it.
2. Multi-Step Reasoning: With stepCountIs(10), the agent can chain up to 10 actions together. It can plan, execute, check
results, and correct mistakes: all in a single interaction.
3. Context Preservation: By storing all messages (including tool calls and results), the agent remembers what it did and can
reference previous actions.
4. Error Recovery: Each tool has error handling. If something fails, the agent sees the error and can try a different approach.
5. Autonomy: Once you give it a task, the agent figures out which tools to use and in what order. You don’t have to spell out
every step.
This is what transforms a simple Q&A bot into a capable assistant that can help you build software.
Wrap up
And there you have it, your own AI agent in under 400 lines of code.
No massive frameworks. No complex abstractions. Just a while loop, some tools, and an LLM.
By now, you have:
• A real agent that can read files, write code, and run commands
- Multi step reasoning where the agent can chain actions together
- Error handling that lets it recover and try something else
- Streaming responses so you see the agent think in real time
- Tool orchestration that turns conversation into actual work
This is not just a chatbot that talks about code; it is an agent that writes and runs it.
Under the hood, the pattern is simple:
- Decide what the agent is allowed to do (its tools)
- Let it combine those tools over multiple steps
- Allow it to learn from errors and retry
- Stream progress so the user never feels in the dark
Now you understand how agents work under the hood. You can extend this with more tools, add memory, implement planning, or build domain specific agents for your own stack.
This is also the pattern we have been applying at CloudHedge. We are an app modernization product company, and our day job is helping customers assess existing workloads and move them to modern platforms. Recently, we have started using LLM driven agents to automate parts of that journey: from assessing applications and orchestrating workflows to generating Dockerfiles and wiring up generative CI or CD pipelines.
If you are looking at a fleet of legacy services and thinking about how to modernize them with AI, this is the kind of problem we work on every day. If you want to explore what an agent like this could do for your workloads, feel free to reach out and start a conversation.
The mystery is gone. You have the power to build your own agents.
Go build something amazing. Cheers!
